Adding the Loft

Progress update!

Oh, hello! It has been a while, and we have some progress to share!

We wish our progress was a little quicker, but we are paying/building as we go. We want to be mortgage/loan free when we move into the Tiny House, so it is important to us that we only buy the materials as we can afford them. Since we have bought most of our materials new, we have a little more saving to do than we first though! We have already purchased a few “bigger items”, like our propane heater, water storage and our propane oven, but I will save that for another post!

Our update for today is – our loft is in! (and another window)

IMG_3054
I forget the exact measurements … but our 6ish ft tall friend was able to walk under the loft without any issues. For now, it seems to be a good height, as we are both under 5’8, but I am starting to wonder if the height will work for the shower! … time will tell.

The loft (so far) appears to be surprisingly roomie! Without the bed, it is hard to judge height, but I think we should both be able to comfortably sit up!
IMG_3055
Our next phase will be to put in the remaining windows – one in the middle of the bathroom, and another in the kitchen.

Roofing Time!

Building has slowed a little, mostly due to work commitments – but we continue to push forward!

With winter approaching, we wanted to make sure the house was water tight before the snow. Even just with the rainy days lately, the exterior boards are looking a little worn.

Since our last update, we have tossed out the idea of the tin/metal roof and installed shingles. We went with the newer “Engineered Shingles” that have a life time warranty, and withstand winds of 130 mph (great for when we are driving down the road!)

They took about the same amount of time to install as the “traditional shingles” do – but they look a lot nicer! They have a folded like pattern, which makes them really pop! We went went with the reddish/brown colour.

17246.HD_Hickory_4

The frustrating part is, we already bought the metal over 2 months ago (about $350 worth), and we are now unsure if we can return it. I am sure we can sell it on Kijiji – but we will not get what we paid back.

Kitchen: Downsizing

I thought I would take a break from writing about all the building, and talk about another huge part of getting ready for Tiny House Living – down sizing.

Currently, we are living in a 1-bedroom duplex. It is about 900sq ft. – about 3 times what our finished Tiny House will be. The crazy thing is, as soon as you start thinking about Tiny House living, you start to notice all the “things” you never use. Those “things” you bought because, at the time, you “needed” them. (Like that ceramic pumpkin that is now doomed to the donate pile.)

You also start to take notice of where you spend the majority of your time. For us, 95% of our awake time is spent in our living room. We never hang out in the bedroom. We are only in the kitchen when we are cooking. And the bathroom … well …

This insight is important for us, because we know we will want to dedicate as much space as possible to our living room. This will most likely mean taking space away from the kitchen, including the cupboards and overall kitchen storage space. So its time to downsize.

I pulled out all of my pots, pans, mixing bowls, and baking sheets and laid them on our kitchen table. I was actually surprised at how many items I had! To be honest, I didn’t even know I had some – they had become lost in the void of the deep bottom corner cupboard.

However, the most surprising was 7 mixing bowls …

IMG_2102


I started with the obvious things to through away …. a rice cooker bowl I still had even though the rice cooker was thrown away over a year ago … plastic Tupperware   (we made the switch to glass) … random pot lids that had no pot.

It was harder for me to get rid of duplicates … cookies sheets, cooling racks, … mixing bowls. BUT our in-laws are moving over 6000km and will be staying with us until they find a place of their own. This was a great mental excuse for me to pair down my items in an effort to help them start their new life!

I was pretty pleased with what I was willing to part with that I didn’t consider garbage (like my never used jumbo cookie cooling sheet :()

IMG_2113

I know that this is still too much to bring into the Tiny House, but I think this is a great start! Phase 2 might be a little harder …

IMG_2107


Honestly, the only time I can think that I will miss any of these items will be when I am cooking a turkey dinner and won’t have enough pots or bowls for all the different side dishes.(or make a jumbo batch of cookies!)

Windows

The windows are in – all thanks to helpful family members 😉

It’s crazy how adding windows really makes the Tiny House look more like a house, instead of just a shed on a trailer. We had mentioned in a previous post, that we bought these windows on sale. Great advice we read during our research stage was to first buy windows (preferably free or on sale), and build the design and house around them.

We were thinking we wanted one large window to bring in light, and make the “living room” feel more open. A large window wasn’t on sale – so we went with 2 medium sized windows, and placed them side by side. After we had started to build, we actually thought this method would work better for the over all support of the house.

IMG_8129

IMG_8203(1)

We still need to figure out where to put the smaller windows. One will go over the sink – but what about the others?

IMG_5926(1)

The door is also in! Again, this was a door we found on sale! A perfect find, because it met our 2 requirements

1) The door needs to have a window
– Natural light is important to us, and will make the space seem more open.

2) Be a full size door (or slightly smaller)

We now need to get a door knob. I am in favor of the “key-less entry” door pads. You don’t have to worry about loosing or forgetting your keys. Its also great if you have guests or close friends – you can just tell them the passcode!

More Progress!

With everything coming together, it is really starting to look like something you could live in!

Our original plan was to move in this September, but with a few big projects being awarded at work, we decided to push the move in date back a few months. We are now planning to move in this December. We really hate that we have put our plans on hold for money – but the offer was truly too good to pass up.

Ugh, I know, I know. This is the whole terrible cycle of consumerism! Working to afford things we don’t truly need. But, we are doing it for the good of the Tiny House! The extra cash from these projects will allow us to put more quality materials into the Tiny House up front, instead of adding them in later. To us, this 3 month push back is worth the short term time loss. Now we will be starting the 2015 New Year off right!

We are both taking a 2 week vacation in September, so the build should really move along then! Lucky for us, we have help from fathers and uncles in the mean time – so the progress hasn’t stopped, and updates will be up soon!


IMG_7431(1)

The Roof

Work has been busy lately and we have rainy weather, so progress on the house has been slow. However, we have started the roof! From the pictures, you can see we went with the pitched roof style. Ideally, we want as much room as possible, while staying under the highway and road height restrictions for underpasses and power lines, which in Nova Scotia is 13.6 feet or 4.15 meters.


mms_img-49625657

We are not building experts, and since we are not building with plans, the pitched roof was the best choice for us to maintain the quality of our build.

mms_img-1365549637

To gain the room in the loft, we made the walls 8 feet high. This allowed us to have a more gentle sloping roof – thus more head room near the sides of the loft once we start to build it. You can see that our roof has a more gradual slope – just enough to keep the snow off during the winter (we hope!)

Next step is to put on the metal roof!


Framing

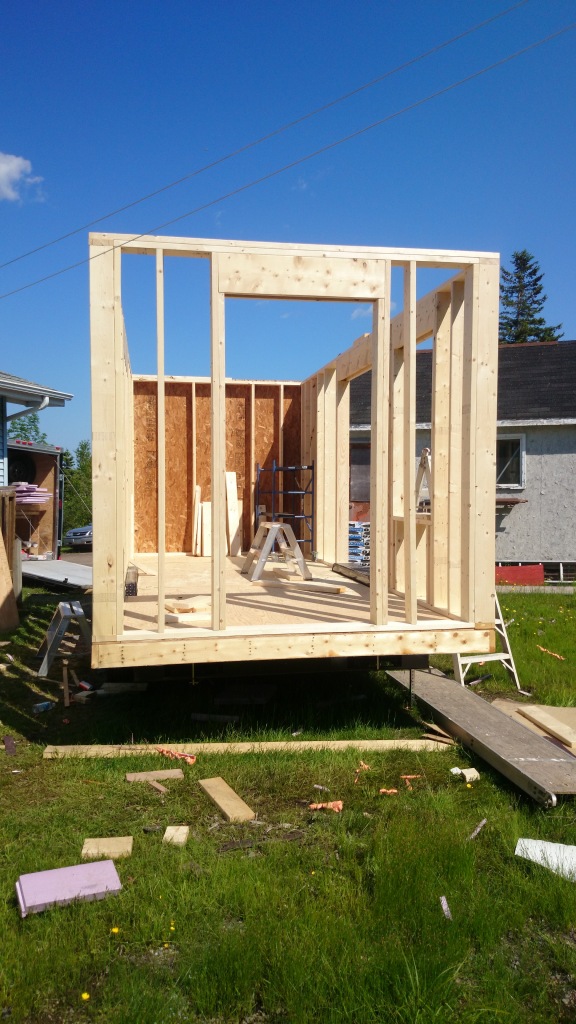
The walls are going up!

1403902302956

We chose to use 2X6 instead of the “standard” 2X4. The 2X6’s will allow us more room for insulation, and also more strength to the entire house.

Since our plan is to spray foam the interior, it will be nice to have the extra room for more insulation. After all the extra steps we are taking, if we are cold this winter – there is something terribly wrong!

We feel the insulation value will be well worth it in the winter, not to mention the summer, when we are trying to keep the house cool.

If you have ever driven on Nova Scotia’s roads, especially the rural routes, you know about the numerous potholes, bumps, twists and turns. Since we are, at this point, unsure where we will be parking the Tiny House, or how often we will be moving it, we want to make sure it is as sturdy as possible.

Also, the cost difference between the 2X6 and 2X4 wasn’t substantial, so we didn’t feel too guilty about going with the 2X6’s.

DSC_0372

DSC_0371

We have framed out windows on one side of the house, and the front door. We are still unsure where we will be placing windows on the other side of the house as we may have to forgo the stairs 😦 (I am so sad!) Time will tell!

DSC_0370

Insulating the Floor

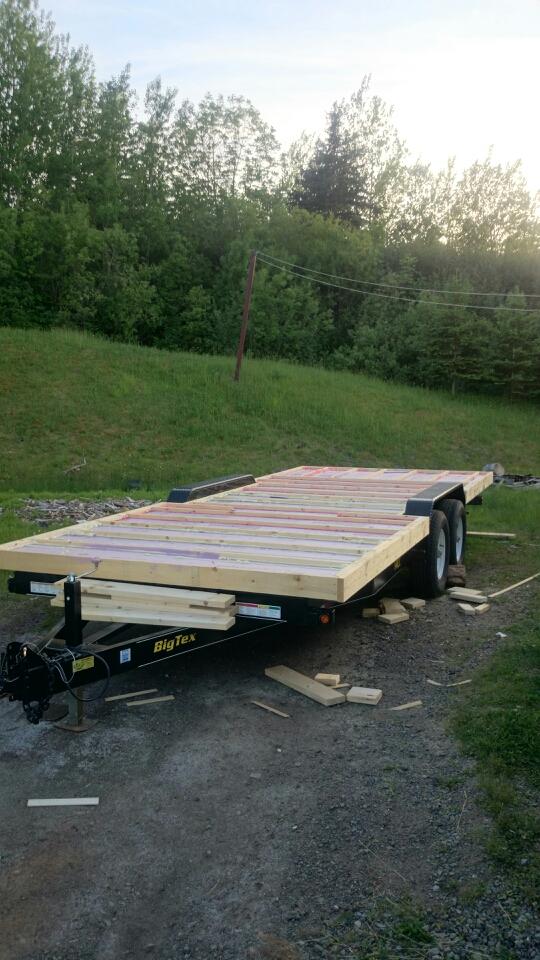
After setting the metal in place at the base of the trailer, we moved on to framing the floor. We went a few inches over on each end – we need to steal space wherever we can after all!

Our original plan was to use spray foam insulation for the entire tiny house. We planned on using a professional, as we have no experience with insulation. I’m sure its not difficult, but we know a few people in the different trades and would rather be safe than sorry. However, this would require someone making two trips out to the site ($$) – one to insulate the floor, and one to do the walls and roof.

Instead, we decided to use a ridged, waterproof 2″ celfort insulation for the floor. It was a little pricer than other alternatives, but we believe the quality will be well worth it.

mms_img-380601363
In each of the “pockets” on the trailer we placed a double layer of insulation, meaning each “pocket” contains 4″ of insulation. Once the insulation was in place, we took a can of spray foam insulation and sprayed the joints where the wood framing touched the metal base. Since the insulation was waterproof, we weren’t worried about the rain that was forecasted that night. and it rained. a lot.

mms_img1190526029

The next morning, every pocket was filled to the brim with water – excepted for one. The rain turned out to be a big help! It showed us our floors were well sealed, and the one pocket we needed a little more spay insulation to make the floors completely tight 🙂 … it did however set us back the entire morning having to vacuum out the excess water from each pocket …

Lots more to do!

Starting Construction

Construction has begun!

Although the base trailer is new and ready to build on, there are a few important steps we wanted to take before building. After all, this is the foundation of the house. This will dictate how the rest of the build goes, so its important we take our time and get this step right!

The first step was to fill in any cracks or holes in the trailer. The last thing we want is for little critters to get inside the insulation (or the house itself!)

To do this,  we placed a layer of metal across the base, and glued it into place. Not only will this insulate the house more effectivly, but this will add an additional boundary against outside lifeforms, and also prevent vegetation from growing up through any cracks. Since we plan on keeping the house in a stationary location once it is finished, small shrubs, grass and other vegetation might grow under or around it. Depending on how easy it is to access underneath the trailer, we might not be able to easily access this area to remove vegetation. Just a better safe than sorry step.

mms_img-2078574283

In this picture, you can see we have layered the bottom with the metal, and started to build the foundation for the floor. We will use this space to insulate the floor. Although using this room to insulate the floor will ultimately take space away from the loft, it is a much needed step for the Canadian Winters we will face!

You can also see that we chose to build out to meet the wheel wells. Not sure how we will design the inside to accommodate them yet.

Buying Materials

The most painful part of this project (for me anyway). Spending money.

We knew this would be a costly adventure, but in the long run, would be worth the upfront expense. It seems the typical do-it-yourself Tiny House runs for about $20,000.

We estimated we could complete the “shell” of the house (insulation, walls, trailer, roof …) for $10,000. We have currently bought most of the materials we will need and are sitting right around the $10,000 mark. Mostly wood for framing. Pretty good estimating on our part if you ask me!

mms_img555307978


We had heard a handy tip to buy windows first (on sale), and build your house around the windows – which saved us having to pay full price! We were able to get the windows and doors on sale, as they were custom windows that someone ordered, but never picked up from the store. This saved us about 15% of the retail price. Not a crazy amount, but that is 15% we can spend on something else!

We opted out of buying a skylight. Although they look amazing on Pintrest, we heard they are hard to seal, and really bad for the insulation factor. Considering we are going to be facing Canadian winters, we thought it would be best to stick to the standard windows.

Since we are building this ourselves, we are able to avoid the pricy cost of labour. Fortunate for us, we have family and friends who are experts in the required trades (carpenters, electricians, propane pipe fitters … ). This project would cost us a lot more if it wasn’t for the help of people interested in Tiny House Nova Scotia!

The biggest cost so far was the 8 X 20 trailer. A steal at $6,500 though.

mms_img1322941635

Once the building stage is complete, I will be sure to add a full list of costs for anyone wondering what the cost of building in Nova Scotia would be.

We still need to figure out what material we will use for the roof, which might be pricier then we were planning. Any suggestions?